Showing posts with label Publisher. Show all posts

Monday, February 13, 2012

Text Feature Book

I wanted a fun way to get the students engaged and thinking about text features. I searched the internet and found a book someone created.  I cannot find out who created the book to give them credit.  If you are JJ, let me know so I can give you credit for the book.  I modified it for my classroom use.  I also found a text feature file of examples.    I don't know where I found it.  If this is your file, please let me know so I can give you credit.  I modified this file too as I added pictures to correspond with the additions I made to the book.  I made the template for students to use in Publisher. 

We went through the book adding comments about each text feature.  Then students opened the example file.  They copied an example and then pasted it on the appropriate page in the text feature book.  I thought we would add arrows to point out the text feature on the example but we ran out of time.

Using the booklet feature on Publisher

    
Text Feature Examples (I have five pages of examples.)   
Click on Properties to print the project as a booklet.

Gallon Man Project

To help students understand the relationship between cups, pints, quarts and gallons each student made a gallon man.


I wanted students to show off their knowledge so they made a postcard using a template from Publisher.  They took a picture of their gallon man and pulled it into the postcard.  

page 1

page 2


The above pictures show the template we used and what page 1 and page 2 looked like.  Below shows the final project (page 1 only) and how to print on both sides.  We printed it so that two printed on a page.  Students cut the postcards out.  Each student took one home and the other one is hanging in the hallway.

Final Postcard Project


Friday, December 9, 2011

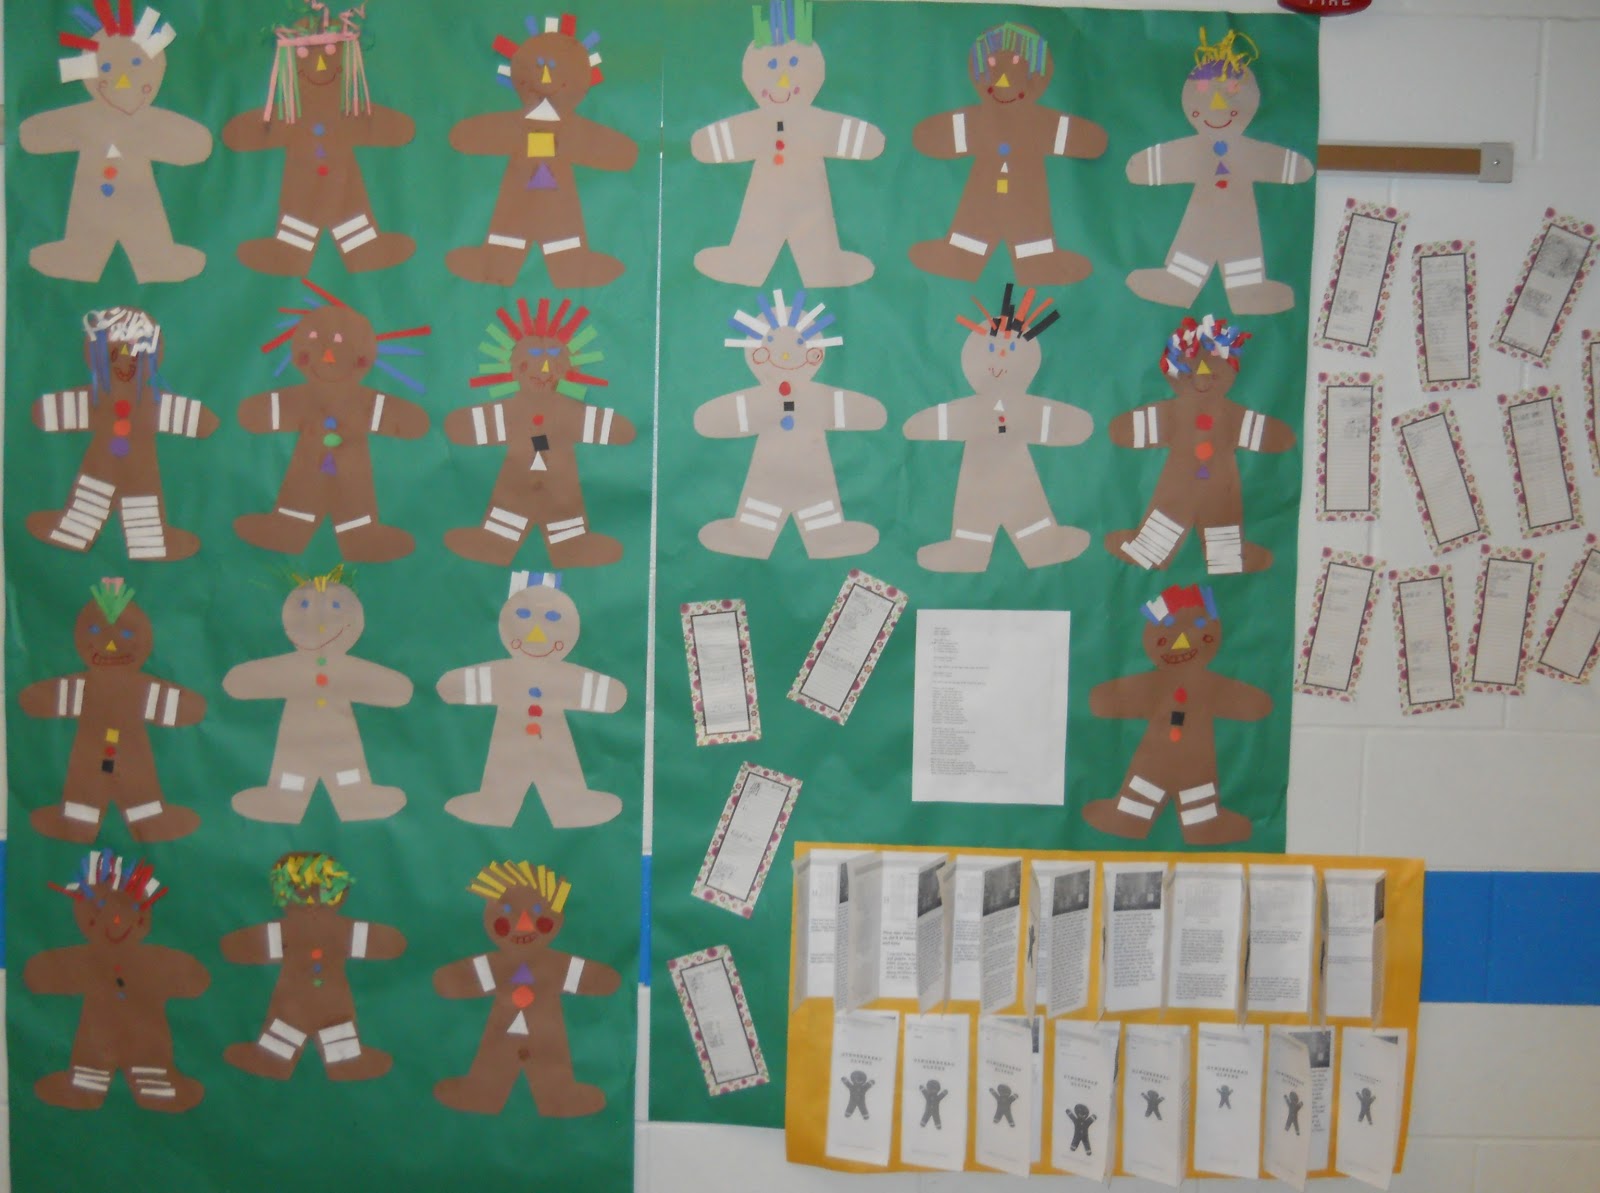
Gingerbread Glyphs and More

Gingerbread glyphs are a great way to brighten the hallways and combine reading and math.  The glyph I like to use is from Mailbox.  I found this link and used it this year.  http://teachers.net/lessons/posts/1415.html
I asked the students to highlight their responses on the form.  I let them choose three from the "things I like to do" list.  The ages didn't fit my classroom so I changed them to fit.

After constructing the gingerbread man, each student was assigned one of the questions to collect data.  We discussed tally marks and how to bundle them and why.  We talked about how many tally marks should end up in the data collection.

We used the collected data to create a graph using the data.  We used http://nces.ed.gov/nceskids/createagraph/default.aspx.  Students downloaded their graph as a jpg file.
Next we opened Publisher and clicked on a brochure template.  We deleted a lot of the information on the brochure and created our own text boxes.  Adding a clip art picture of a gingerbread man added a little extra fun to our project.  Each student inserted the graph they made and created a text box under it to analyze the data in their graph.  Students inserted a graph from a classmate from each one of the questions.  They created a text box to write about what they liked about the project and what they learned.  We had one side of the brochure left so students wrote a story about their gingerbread man.


Thursday, November 17, 2011

Word Problems - Signal Words


We worked on reviewing signal words for addition and subtraction word problems.  While this seems pretty basic and I know that not all problems will contain these words, too many students don't understand which operation to use.  

Each student created two word problems using two different signal words for addition and then for subtraction.  They used Publisher, printed and then cut them apart.  We glued them to butcher paper to display in the hallway.  The kids loved that the number sentence was upside down on their screen.  I showed them how to rotate it and some forgot to rotate it back.  

When printing, don't forget to change the screen to two-sided.  Below is an example of page 1 in the Publisher file.


Here is page 2 as it would look on the screen.


After the word problems were checked by me, they were allowed to find a clip art picture to place on the problem.

Wish I would have outlined the pictures so you could see them better.  The first page text boxes were near the bottom of the landscaped page, the second page boxes were at the top.

Signal words we used were:  addition:  altogether, added, total, in all, plus, sum; subtraction:  left, how many...more...than, how many...less...than, difference, lost, shorter, longer

Thursday, October 20, 2011

Ten Page Stories

Ten page stories are actually nine pages now, but I'm so used to calling them ten page stories the kids just let me get by with it.  This year we started the stories on the computers instead of writing them on paper first.  Students would write, print, edit with me, fix on the computer, write the next page, and go through the process over and over until each page had "done" written on it.  Page 1 is the setting of the story; page 2 is all about the character.  (This is the page that used to be two pages.)    The character should be described physically and by using character traits.  Page 3 is the first event of the story; page 4 is the problem.  Page 5, 6, and 7 are all events trying to solve the problem.  Page 8 solves the problem.  Page 9 ends the story.  I have a list of banned words for each page.  Some of them include you, I, so, me, and many more.

Students are drawing illustrations for their pages.  I taught them how to scan and they are scanning their pictures as they get them done.  They know how to edit the pictures and they are inserting them into their document.  (We used Publisher.)    After we have all of the pictures inserted we will save the document as a PDF file and upload it to the publisher.  Each child will get a free paperback copy of their illustrated story.  They are pretty excited about being a published author.

Tuesday, September 6, 2011

Health Game

Students will use Publisher to create a memory card game about nutrition.  I'll make a template for them to use and they'll label the cards.  They will also find clip art to use on the card that matches the term.  I'll post an example when we get them done.

Wednesday, August 31, 2011

Using Publisher to create a graphic organizer

Instead of copying the graphic organizer for students to complete as a pencil/paper task the students created the graphic organizer using Publisher.  It was a simple organizer and allowed the students an opportunity to practice using Publisher.  Students created a text box with a border.  A bold title was centered along with changing the font and size of the text.  Students then changed the next line of text to align to the left of the box and toggled the bold setting off.  The boxes were copied and pasted until all needed boxes were placed on the document.  Headings were changed to fit the graphic organizer.  Students then clicked in each box and added the applicable content to each box.  A text box was added to the top of the document for the student's name.

The organizer had five boxes.  Problem, Action, Action, Action, Solution

Friday, August 19, 2011

4th grade, 4th grade

Brown Bear, Brown Bear, What Do You See?  (Bill Martin Jr and Eric Carle) You might think this book is too simple for 4th grade.  I read it to my class and they loved it.  I think the repetition was comforting and they loved the descriptions given the animals along with the illustrations.

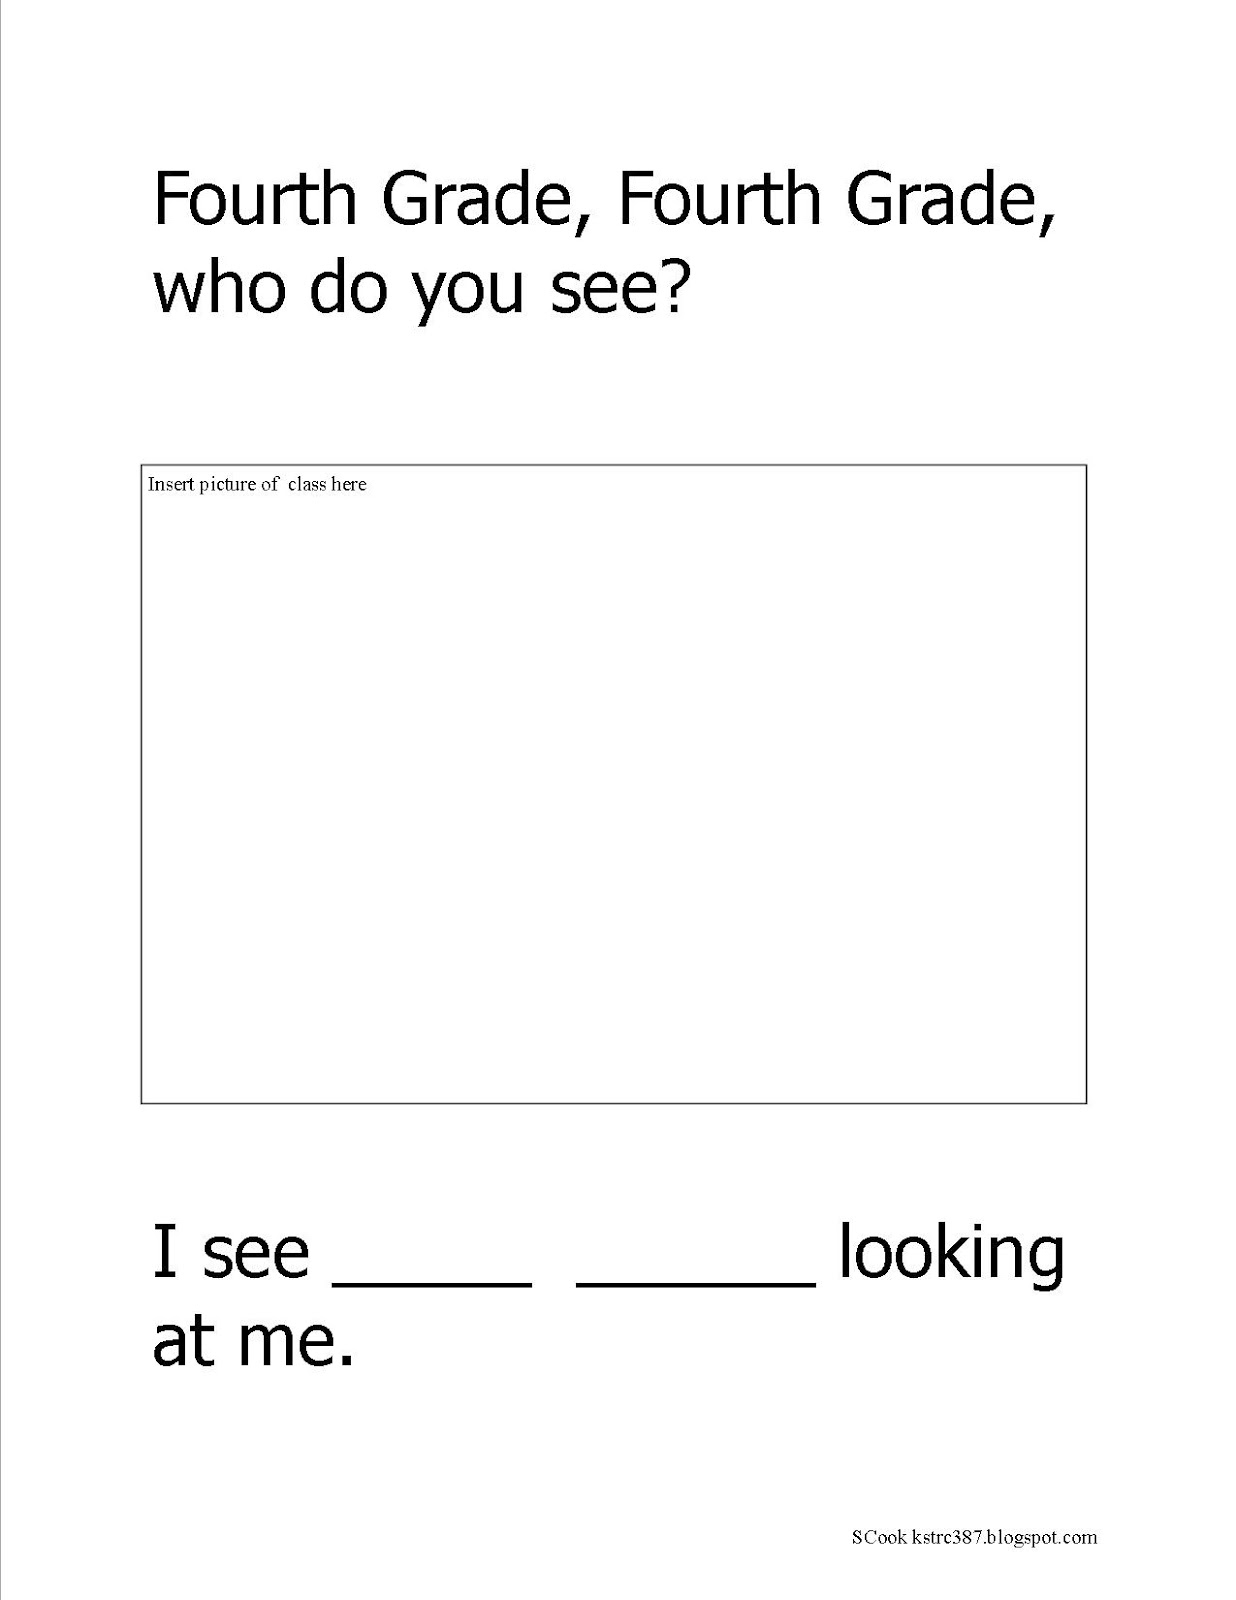
I read it to them because I wanted them to create a book.  I wanted to create a book using the repetition to give students an opportunity to practice using Publisher and a chance to get to know their classmates.  It kept the basic document the same which made it easier for me to focus on the technology skills.  They had to find a document (the template I made) in the public folder. The file was renamed and saved in their document file.  They highlighted and replaced text.  They inserted a picture and re-sized it.  They saved and printed their document.  (Picture of template below.)

The students each have a number assigned to them in the classroom.  The number goes on everything assigned to a particular student.  The number is assigned after putting students in alphabetical order.  So my first child in alphabetical order is given the number 1.  Next gets 2 and so on.  Students line up according to their number when we leave the classroom so they are familiar with their number and the students who stand near them in line.  I used the class numbers for this project  to make it easy to know who was "seeing" whom next.

Student 20 did Student 1, Student 1 did Student 2 and so on.  I explained the students would create a page using the classmate who stood behind them in line.  The last person in line (referred to as student 20 in this example) did the first student in line (referred to as student 1 in this example).

The first page started with Fourth Grade, Fourth Grade, who do you see?  Then we put a picture of the class.  The bottom of the page had the reply.  I see Joyful Jamie (student 1) looking at me.  (All student names are made up.)   I made the first page.

Student 20 made the next page.  Joyful Jamie, Joyful Jamie, who do you see?  Student 20 put Joyful Jamie's (student 1) picture in the middle of the page.  The reply was typed at the bottom of the page.  I see Marvelous Mary (student 2) looking at me. 
Student 1 made the next page.  Marvelous Mary, Marvelous Mary, who do you see?  Student 1 put Marvelous Mary's (student 2) picture in the middle of the page.  The reply was typed at the bottom of the page.  I see Incredible Ian (student 3) looking at me. 

Student 2 made the next page.  Incredible Ian, Incredible Ian, who do you see?  Student 2 put Incredible Ian's (student 3) picture in the middle of the page.  The reply was typed at the bottom of the page.  I see Graceful Gloria (student 4) looking at me.
This continued for all students.

Student 19 put the reply at the bottom of the page as I see my class looking at me. 

The last page of the book has our class name at the top and another picture of the class...I used a silly picture for the last picture and I created this page.


To help the students I gave each student a sticky note.  They then checked the name tag of the person who stands in line behind them (as noted above).  The name tag checking was to verify the spelling of the classmate's name.  Then students grabbed a dictionary and looked for a positive word to use.  The word had to start with the same letter as the classmate's name.  Marvelous Mary, Incredible Ian, Right-handed Roger  (We talked about alliteration.)

Students had to okay words such as acrobatic or jumping to describe their classmate.

Now each student had a sticky note containing the classmate's name and descriptive word.  They opened the file containing the template I made for them using the first page verbiage.  Students highlighted the words Fourth Grade and changed them to their classmate's name.  Then the classmate's picture was inserted.  Once we had that much done students saved the file.  The next part was tricky for them.  They tried to understand and I had to tell them to just listen and follow the directions.  They had to "borrow" the sticky note of the person their page is about.  So Joyful Jamie (Student 1) "borrowed" the sticky note Marvelous Mary (student 2) made.  The borrowed sticky note had the name of the person to put at the bottom of their page.  Once they highlighted and replaced the name at the bottom of the page they returned the sticky note to the person from whom it was borrowed.  It sounds complicated, but it really isn't.

Each student saved and printed the document.  It turned out to be a really cute book.  Not only did it give us the opportunity to practice some tech skills, the project allowed us to discuss alliteration, follow directions, use a dictionary, and discuss why some names had a squiggly red line and some didn't.

We published two copies of the book.  One was bound and the other was displayed across the wall by our classroom door.  We left it up for the entire year.

Here is a photocopy of the template of the book.  The students used page 3 (except for the last student who used page 4).  I would save a copy of the document and delete the pages not needed for the students for a student template. (I would be glad to share the template.  Leave me a message with your email address and I'll send it to you.  I will NOT publish your email address.)   Post a message to let me know how it works for you and I would love to know what changes you make to it.


Wednesday, August 17, 2011

New School Year

Today was the first day with students.

We used Publisher to make a name tag for desks.  I made a template for the students to use.  They opened the file and highlighted boxes to change information.  They inserted a picture to personalize the name tag.  The pictures had to be resized to fit in the box.  The students saved the file and printed it.   Since the name tags have student pictures on then, do I need a seating chart?

Tomorrow we are going to use Bill Martin Jr/Eric Carle's book Brown Bear, Brown Bear to create a book about our class.  This will give students a chance to practice what we did today.  
Brown Bear Brown activity

Friday we are going to work on a number book for a kindergarten class.  Students will get to practice one more time the skills we learned using Publisher although instead of a picture students will use clip art to illustrate the numbers.

Thursday, May 5, 2011

Word Art Collage

I went to the TRC Celebration last week and learned pictures can be used to fill letters in word art.  My brain has rolled that information around and around trying to think of a way to use that in the classroom.  One of our vocabulary words this week was collage.  We took all the pictures of the school year and created a collage.  Students created their own using pictures they were in and I let them use the jpeg files they created of their work for previous projects.  They made the collage in Publisher.  We could have used PowerPoint and the next time I'll probably just use PowerPoint.  We saved the collage as a jpeg file.  We pulled the newly created jpeg file into PowerPoint (there's probably a faster way to do this but this is the way I did it this time).  We cropped the write off of the edges and made a nice square/rectangle of the pictures.  We stretched it to fit the screen and saved it as a jpeg.  Then in a new PowerPoint file each student typed his/her name using WordArt.   (This next part I'm not as sure of as I need to do it one more time to refresh my memory - so if it doesn't work, check back as I'll update this when I get a chance.)  I think we right clicked on the word art and went to format text.  After clicking fill we clicked photo and uploaded the photo.  It's pretty cool.  We saved it as a jpeg.  In a new PowerPoint we pulled in the WordArt collage picture.  We stretched it, saved it and printed it.  I usually don't let the kids print in color for obvious reasons, but I let them print their name collage in color.  What a souvenir they have of their school year.   Someday I'll do this again...when I have a minute to think as I think we had a lot of steps we didn't need.

This can be used with vocabulary, too.  Choose pictures to illustrate a word to make a collage and then pull that collage into the word using word art.

Wednesday, March 30, 2011

ABC Measurement Books Are Here!

Our books came today.  I was a little concerned about how they would look since we used Publisher, converted the file to a PDF and then uploaded to the publishing company's website, but no reason to worry.  They are GREAT!  I'm very happy with them.

Friday, March 4, 2011

Newsletter

I usually write a newsletter to send home each week.  This week the students are going to write it.  I picked a format from the templates Publisher offers.  They'll title it and the content will be information about state testing tips.  I hope this helps them remember what to do and I hope they share it with their parents since it will be authored by them.

Update:  We had a lot of disruptions to our day and I was concerned we wouldn't have time to get the newsletter done so I created some text boxes in Publisher containing reminders of tested concepts.  The students picked one of their pictures or a picture from one of the projects to put in the newsletter and wrote an article about test taking strategies.  The students enjoyed creating the newsletter and seemed excited to show them to their parents.

Thursday, February 24, 2011

Pictographs Done!

I created the "skeleton" of the pictograph for the students and then together we created the pictograph using data we created from polling the class about our favorite ice cream.  I kept it simple giving students three choices, chocolate, vanilla and other.  Each ice cream cone on the graph equaled two.  Making a 1/2 cone was interesting.  (We put a box over half of the cone and filled the box with white.) We put the "guts" into the pictograph.  The students watched me on the big screen and they did the same on their computers.  They were delighted with their graphs. 

We collected new data for each student to create their own pictograph.  We did this in about 20 minutes.  Each student picked a topic and two choices to put with a category of other.  I open the smart software and each student turned on their clicker.  I put the topic and choices on the page and the students voted.  When we were done each child had a bar graph with their data.  They turned that data into a pictograph.  This time they did the skeleton along with the guts.  :)

Saturday, September 18, 2010

Publisher

I decided to try Publisher with the students and tried to do too much.  They became very frustrated, I became frustrated so we used another program for whatever we were doing.  I found out that experience soured them on Publisher.  I left Publisher alone for a week or so.  Then I made a main idea detail chart from one of the stories in our reading series.  I used the information from the teacher's manual to create boxes.  I put the main idea boxes on one side of the Publisher document, the detail boxes were on the other side and out of order.  The students had to grab a detail box and move it flush with the correct main idea box.  They loved manipulating the boxes.  It gave us a chance to talk about what to do if they change the size of the box or delete a box.  By the time we were done they were no longer were afraid of Publisher.  We didn't do much, but they were successful and that changed their minds about the software.  Now we have used Publisher a few more times and each time I add a few more new things.  I love using this program and they are starting to love it, too.