At least it is new to me!
http://www.sharemylesson.com/mypublicprofile.aspx?uc=2289298&page=1&SFBC_FilterOption=8
Aligned to common core standards! Worth checking out!
Wednesday, July 17, 2013

Saturday, March 30, 2013
Bats
One of the many things I miss about teaching is the opportunity to be creative. (I know, it seems that the powers that be are doing their very best to take this away from teachers. Sad.)
A friend asked me to sub in her third grade classroom for two consecutive days and allowed me to create a project for her students.
This is the result of the two days.

Students answered the question about whether or not they have ever seen a bat by stamping the bat stamp in the yes or no column on our survey.
They answered the first two question in their 'bat book' that is from http://www.kidzone.ws/animals/bats/ws12.htm. They took a few minutes to talk about what they know and what they wanted to learn with their team.
Then we read the book Bats by Gail Gibbons. On chart paper we logged interesting facts as we read the book. We discussed the diagram in her book. We talked about the bat life cycle. They completed the back page of their 'bat book' and set it aside for later.
Students drew the border line around the construction paper edge using a ruler.
On a separate piece of paper students drew the (1) life cycle of a brown bat and labeled it.
My example shows the little brown bat life cycle from www.kidzone.ws as I didn't have time to draw it.


(Just so you know, ahead of time I cut paper for all of the learning I wanted presented on the poster. I've done these before where spaces were bordered for learning presentation and some students have a tough time recreating the spaces they see. As I was short on time I thought the paper would help with spacing and it also created some fun. There's just something about pockets and little books and folding paper.)
They folded the life cycle paper in thirds and applied glue to the middle section on the back. It was glued in the bottom right corner. I stressed getting it close to the border lines but not covering up the border lines.
Next they drew a (2) diagram of the parts of a bat and labeled it. It was glued next to the life cycle.


The 'bat book' presented a problem as it could not be glued to the poster without losing information or taking up too much space (and some of it upside down!). A pocket was created to hold the book. I think this might have been the highlight of the poster.
Using a rectangle, the ends were folded under. Glue was put on the folded under part and along the bottom of the paper (under the folded part, too). The (3) pocket was placed on the poster next to the diagram. I'm sorry I don't have a picture illustrating making the pocket.


If we would have had more time I think it would be fun to write a story with a bat as a main character. I read Bat Love the Night by Nicola Davies to the students. This would be a great opportunity to work on descriptive words and adding voice to writing.
A friend asked me to sub in her third grade classroom for two consecutive days and allowed me to create a project for her students.
This is the result of the two days.

Students answered the question about whether or not they have ever seen a bat by stamping the bat stamp in the yes or no column on our survey.
They answered the first two question in their 'bat book' that is from http://www.kidzone.ws/animals/bats/ws12.htm. They took a few minutes to talk about what they know and what they wanted to learn with their team.
Then we read the book Bats by Gail Gibbons. On chart paper we logged interesting facts as we read the book. We discussed the diagram in her book. We talked about the bat life cycle. They completed the back page of their 'bat book' and set it aside for later.
Students drew the border line around the construction paper edge using a ruler.
On a separate piece of paper students drew the (1) life cycle of a brown bat and labeled it.
My example shows the little brown bat life cycle from www.kidzone.ws as I didn't have time to draw it.


(Just so you know, ahead of time I cut paper for all of the learning I wanted presented on the poster. I've done these before where spaces were bordered for learning presentation and some students have a tough time recreating the spaces they see. As I was short on time I thought the paper would help with spacing and it also created some fun. There's just something about pockets and little books and folding paper.)
They folded the life cycle paper in thirds and applied glue to the middle section on the back. It was glued in the bottom right corner. I stressed getting it close to the border lines but not covering up the border lines.
Next they drew a (2) diagram of the parts of a bat and labeled it. It was glued next to the life cycle.


Using a rectangle, the ends were folded under. Glue was put on the folded under part and along the bottom of the paper (under the folded part, too). The (3) pocket was placed on the poster next to the diagram. I'm sorry I don't have a picture illustrating making the pocket.


During math time the students completed the Bat Wing Span book. I had hoped we would have time to survey students about myths (http://www.bats4kids.org/) and feelings about bats to create data for graphs and to analyze, but there wasn't time.
I created the book using Publisher. The wing span chart was created in Excel using data I found on various websites.

If you don't know how to make a little book, I found this video to help. http://www.youtube.com/watch?v=mmPZlFBR6I8
We completed the (4) book and added it to our poster.


During Science time we review what we read earlier by reading and talking about the following website. http://www.globio.org/glossopedia/article.aspx?art_id=45&art_nm=Bats
In writing we started a paragraph about what we have learned about bats.
The next day we started off with the book Stellaluna by Janell Cannon.
As we read we logged differences between bats and birds. Using a venn diagram from math-aids.com (I added clip art of a bat and a bird) students compared and contrasted birds and bats. The (6) venn diagram was ready to be added to the poster. On my example we waited until we had the facts and opinions done and then added all three to the poster.
The little 'matchbooks' are a fun way to add (5) facts and opinions to the poster. Once again we were running short of time so I limited the facts to two and the opinions to two.


We added, reviewed, edited, and rewrote the (7) paragraph about what was learned to the piece of notebook paper custom cut to fit the space left on the poster. For kids who like to write a lot, a second sheet was added and students were instructed to not write on the top line. I used that as a glue line to attached the top (first page) and their writing was two pages, the top one flapped open.

Finally, the best part! A chance to (8) illustrate a bat. I didn't give them paper for this, it was done to the poster paper.

To finish the poster a (9) title and border was added. Students who finished early could add an illustration of another bat on the pocket and fact/opinion matchbooks.


If we would have had more time I think it would be fun to write a story with a bat as a main character. I read Bat Love the Night by Nicola Davies to the students. This would be a great opportunity to work on descriptive words and adding voice to writing.
Wednesday, February 6, 2013
Matchbook Text Features
Possible Common Core Standards:
RI.4.7
I was given the opportunity to come up with a reading activity for third graders within some parameters. This will be done during core reading, writing, and science for a total of about two, two and 1/2 hours. I will not have access to computers with the students so we are cutting and pasting.
The topic the students will learn about is earthquakes. Since we are in the middle of the country and rarely experience earthquakes the students are very curious about them.
The students will read and discuss Seymour Simon's Danger! Earthquakes. We will look for text features in the book. Because I will have limited time, I found text features about earthquakes on the internet to use for a project. Usually I would have the students create their own. The text features will be glued on a 'matchbook' and students will label the them. They will write one sentence about what they learned from the feature. There is a spot on the 'matchbook' for students to write a short (two or three sentences) paragraph about which text feature they liked the most. Finally students will write about earthquakes using the information from the text features, the book we read, and the websites listed below.
Here are a couple of websites we are going to visit.
http://www.sciencekids.co.nz/videos/earth/whatisanearthquake.html
http://earthquake.usgs.gov/earthquakes/map/
Here's a picture of my sample of what the students will do:
(I try hard to make sure I give credit for the graphics as it is not my intention to violate any copyright laws. If you think I have, please let me know. I noticed the safety list doesn't have the reference on the picture. That is being corrected for the students.)
RI.4.7
I was given the opportunity to come up with a reading activity for third graders within some parameters. This will be done during core reading, writing, and science for a total of about two, two and 1/2 hours. I will not have access to computers with the students so we are cutting and pasting.
The topic the students will learn about is earthquakes. Since we are in the middle of the country and rarely experience earthquakes the students are very curious about them.
The students will read and discuss Seymour Simon's Danger! Earthquakes. We will look for text features in the book. Because I will have limited time, I found text features about earthquakes on the internet to use for a project. Usually I would have the students create their own. The text features will be glued on a 'matchbook' and students will label the them. They will write one sentence about what they learned from the feature. There is a spot on the 'matchbook' for students to write a short (two or three sentences) paragraph about which text feature they liked the most. Finally students will write about earthquakes using the information from the text features, the book we read, and the websites listed below.
Here are a couple of websites we are going to visit.
http://www.sciencekids.co.nz/videos/earth/whatisanearthquake.html
http://earthquake.usgs.gov/earthquakes/map/
Here's a picture of my sample of what the students will do:
 |
| This is the top part of the matchbox project. |
 |
| This is the inside of the matchbox. |
Tuesday, January 29, 2013
Number Sense
So many of my students didn't feel comfortable with numbers. They saw numbers as something to fear. I did the following activities with my second graders and then again when I taught fourth grade.
I made a set of cards asking questions about a number. Each set of cards was printed on a different color of tagboard. I usually made one set for a group. Because each set was a different color it was easy to keep the sets of questions together. If a card ended up on the floor, I knew who to give it to based on the color. I kept the number of questions to less than twenty. Each group was given a number to use with the questions. Sometimes they took turns flipping a question over and all would write the answer on their boards. Sometimes one would answer the question with the others checking, then another child would answer the next question with all checking, and so on.

I also printed the cards on blue paper. (There's nothing special about blue, one year I printed them on green.) I printed enough so that each child in the classroom had a set. I gave a set of 'blue cards' to parents at conference time and explained how to use them. I explained how the 'blue cards' were now a part of homework in the evening.
I put a picture of some of the cards below. To use them, choose a number. I expected second graders to use a number between 1 and 50 to start with and we worked our way to larger numbers. Actually, I started the same in fourth grade, but I worked them to larger numbers faster than the second graders. The cards are using the number 6 as an example.
The purpose behind the cards was to get the students thinking about numbers in more than one way and to become comfortable with them. Questions could be removed from the stack and new ones added as the year progressed.
My highest level students were allowed to use much bigger numbers and some of the cards were not used with them.

I made a set of cards asking questions about a number. Each set of cards was printed on a different color of tagboard. I usually made one set for a group. Because each set was a different color it was easy to keep the sets of questions together. If a card ended up on the floor, I knew who to give it to based on the color. I kept the number of questions to less than twenty. Each group was given a number to use with the questions. Sometimes they took turns flipping a question over and all would write the answer on their boards. Sometimes one would answer the question with the others checking, then another child would answer the next question with all checking, and so on.

I also printed the cards on blue paper. (There's nothing special about blue, one year I printed them on green.) I printed enough so that each child in the classroom had a set. I gave a set of 'blue cards' to parents at conference time and explained how to use them. I explained how the 'blue cards' were now a part of homework in the evening.
I put a picture of some of the cards below. To use them, choose a number. I expected second graders to use a number between 1 and 50 to start with and we worked our way to larger numbers. Actually, I started the same in fourth grade, but I worked them to larger numbers faster than the second graders. The cards are using the number 6 as an example.
The purpose behind the cards was to get the students thinking about numbers in more than one way and to become comfortable with them. Questions could be removed from the stack and new ones added as the year progressed.
My highest level students were allowed to use much bigger numbers and some of the cards were not used with them.

Monday, January 28, 2013
Fractions and Money
I'm not sure exactly where this would fit in the common core standards. Feel free to comment.
I like using a dollar bill for fractions and created a quick Who Has game to review what was learned.


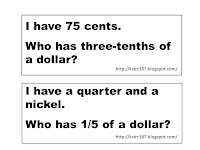

I like using a dollar bill for fractions and created a quick Who Has game to review what was learned.


I know most people play the Who Has games as a whole group. I like for students to play it individually. I give each student a set of cards to play the game and walk around to help those who need help. To extend the game above, ask students to create more cards to go with the game. Remove the question on the last card and create more questions with answers. Remind them to keep track of their answers as they can't use an answer more than once.
Wednesday, January 9, 2013
Sheila Ray, The Brave (words for said)
Sheila Ray, The Brave
Author: Kevin Henkes
Possible Common Core Standards:
RL.4.3
W.4.3
How many times have you read a student's story and the word said is used for every conversation? Use Sheila Ray, The Brave to help your students understand the usage of other words make their writing much more interesting. First, cover all of the said words in the story with a sticky note with the word said. Read the story. Go back through the story page by page removing the sticky notes and logging the word 'substituted' in the story on chart paper. Talk about how it makes the event interesting. Ask students to watch for more 'substitute' words for said in other text. Keep the chart in the room for use when writing.
I like the way Mr. Henkes uses other words yet also uses said in his story. I think it is important for students to know it is okay to use said....just not every time. :)
Sheila Rae, The Brave (Word Study)
Sheila Ray, The Brave
Author: Kevin Henkes
Possible Common Core Standards:
RF.4.3
suffix -ed
Go on an -ed word hunt as a class or in small groups. Put each word on a card.
giggled
walked
tied
stepped
attacked
no-handed
closed
yelled
and more
Ask students to study the ending sound of the word. Do they all end with the 'd' sound? Ask them to sort them. This is a great springboard activity to getting the students to understand the sounds of -ed. I frequently had students spell words wrong just because they didn't understand this. You can continue the learning by adding to the word sort when reading other text and finding more -ed words.
Author: Kevin Henkes
Possible Common Core Standards:
RF.4.3
suffix -ed
Go on an -ed word hunt as a class or in small groups. Put each word on a card.
giggled
walked
tied
stepped
attacked
no-handed
closed
yelled
and more
Ask students to study the ending sound of the word. Do they all end with the 'd' sound? Ask them to sort them. This is a great springboard activity to getting the students to understand the sounds of -ed. I frequently had students spell words wrong just because they didn't understand this. You can continue the learning by adding to the word sort when reading other text and finding more -ed words.
Friday, January 4, 2013
Whistle for Willie
Whistle for Willie
Author: Ezra Jack Keats
Possible Common Core Standards:
RL.4.2
RL.4.3
W.4.3
This idea could be done in one or more writing sessions depending on how much you want to develop it in your classroom.
This is a great story about perseverance. Read it and discuss it. How does the author let the reader know how much Willie wants to whistle? How do you as the reader know he is trying?
Ask students to think of something they had to work hard to learn how to do. My favorite example is my youngest son wanted to hit a ball with a bat. He spent hours in the yard throwing the ball up and swinging and missing. One day he finally hit it and he rarely missed after that. It could be learning to read or learning to subtract. For the students who tell you they didn't have any problems learning anything, tell them to make something up. :)
Ask students to think of either something that truly happened while learning or to make something up that would make the story more interesting. In Whistle for Willie, Willie hid in a box trying to whistle for his dog. In my son's story he could spin every time he misses and make himself dizzy. It's up to you as to whether or not it has to be realistic.
Author: Ezra Jack Keats
Possible Common Core Standards:
RL.4.2
RL.4.3
W.4.3
This idea could be done in one or more writing sessions depending on how much you want to develop it in your classroom.
This is a great story about perseverance. Read it and discuss it. How does the author let the reader know how much Willie wants to whistle? How do you as the reader know he is trying?
Ask students to think of something they had to work hard to learn how to do. My favorite example is my youngest son wanted to hit a ball with a bat. He spent hours in the yard throwing the ball up and swinging and missing. One day he finally hit it and he rarely missed after that. It could be learning to read or learning to subtract. For the students who tell you they didn't have any problems learning anything, tell them to make something up. :)
Ask students to think of either something that truly happened while learning or to make something up that would make the story more interesting. In Whistle for Willie, Willie hid in a box trying to whistle for his dog. In my son's story he could spin every time he misses and make himself dizzy. It's up to you as to whether or not it has to be realistic.
Thursday, January 3, 2013
Sheila Rae, The Brave
Sheila Rae, The Brave
Author: Kevin Henkes
Possible Common Core Standards:
RL.4.1
RL.4.3
RL.4.4
W.4.3
W.4.4
Read Sheila Rae, The Brave. Ask for one characteristic that describes her...looking for the word brave. Look for and log examples of where she was brave and discuss why those events characterize her as brave. Was she brave throughout the story? Discuss. Talk about how the story revolves around the word brave.
Choose a word as a class to write a story similar to Sheila Rae, The Brave. Brainstorm and list possible examples displaying the characteristics of the word. Think of a few situations that would be the opposite of the word for the problem in the story. Write a class story using the examples thinking of a way to solve the main character's 'problem' and end with the character defining the main word again just as Sheila Rae does in her story. Title the story patterned the same as Sheila Ray, The Brave and make sure to put 'patterned after Sheila Ray, The Brave by Keven Henkes' with it.
Ask students to each (or with a partner) choose a word to base a story. I posted a link to a list of possible words below. Sneaky or messy come to mind as fun words to use. If the words seem too easy, use a thesaurus to find a similar word but not as well known. Have fun with it! After choosing the word, start logging situations that would make a reader think of the word. Think of a few situations that would be the opposite of the word for the problem in the story. Put the situations into a story. Make a bold statement using the word to start the story and include a solution to the problem along with an ending to the story. Title the story patterned the same as Sheila Ray, The Brave and make sure to put 'patterned after Sheila Ray, The Brave by Keven Henkes' with it.
List of character traits:
http://www.readwritethink.org/files/resources/lesson_images/lesson175/traits.pdf
Author: Kevin Henkes
Possible Common Core Standards:
RL.4.1
RL.4.3
RL.4.4
W.4.3
W.4.4
Read Sheila Rae, The Brave. Ask for one characteristic that describes her...looking for the word brave. Look for and log examples of where she was brave and discuss why those events characterize her as brave. Was she brave throughout the story? Discuss. Talk about how the story revolves around the word brave.
Choose a word as a class to write a story similar to Sheila Rae, The Brave. Brainstorm and list possible examples displaying the characteristics of the word. Think of a few situations that would be the opposite of the word for the problem in the story. Write a class story using the examples thinking of a way to solve the main character's 'problem' and end with the character defining the main word again just as Sheila Rae does in her story. Title the story patterned the same as Sheila Ray, The Brave and make sure to put 'patterned after Sheila Ray, The Brave by Keven Henkes' with it.
Ask students to each (or with a partner) choose a word to base a story. I posted a link to a list of possible words below. Sneaky or messy come to mind as fun words to use. If the words seem too easy, use a thesaurus to find a similar word but not as well known. Have fun with it! After choosing the word, start logging situations that would make a reader think of the word. Think of a few situations that would be the opposite of the word for the problem in the story. Put the situations into a story. Make a bold statement using the word to start the story and include a solution to the problem along with an ending to the story. Title the story patterned the same as Sheila Ray, The Brave and make sure to put 'patterned after Sheila Ray, The Brave by Keven Henkes' with it.
List of character traits:
http://www.readwritethink.org/files/resources/lesson_images/lesson175/traits.pdf
Wednesday, January 2, 2013
Common Core Standards
I found the following website with a checklist for the CCS. How cool is that!
http://www.thecurriculumcorner.com/2012/08/18/common-core-checklists/
http://www.thecurriculumcorner.com/2012/08/18/common-core-checklists/
Tom
Tom
Author: Tomie dePaola
Possible Common Core Standards:
RL.4.3
W.4.3
Tom is a great springboard to getting kids to write about real life experiences with a special person in their lives.
To start with, read the book to the students. Make a list of events as the book is read.
After reading the book use the list to revisit the book and look for additional details which made the event interesting. Assign an event to a pair or group of children and have them complete a web of details with one event on chart paper. This would be a great way to discover that not all of the events have the same about of 'time' in the story. I would ask for minor events and major events after working through all of them.
Next look for transitions in the story. How does the author move from one event to the next. Chart the transitions.
Ask students to think about a person in his/her life who is special. It could be a grandparent, aunt, uncle, parent, older/younger sibling, friend or neighbor, but it should be someone he/she has contact with and spends time with on a regular basis. Brainstorm a list of events. (If a child can't choose, he/she could write two names down and then brainstorm 'events' for both and finally choosing based on the events most interesting to the student.)
Remind students events don't have to be something major like the chicken hands. Ask students to choose one event to write about. I would continue to ask students to write about individual events without worrying about putting them together into a story. Write them on separate pieces of paper. Once all of the events are written and edited, ask students to put the events into an order than makes sense to them. Students should consider one to be the beginning of the story and one should lend itself to concluding the story. Refer back to Tom. Talk about transition words that may work to link the events together.
Title the book the name of the person who shared the events with the author.
Ask students to share their story with a friend or should partner to do the final editing.
Publish.
I really like using studentpublishing.com. If you have access to computers, students could type the story using word, convert to pdf and upload it to the website. My students illustrated and then scanned the illustrations. The jpg files were pulled into the document before converting to a pdf file. We also typed the story on the website using their software and students can illustrate using the graphics on the website. To manage each student's story progress I created a chart. When I find the chart I will post a picture.) There are other publishing companies on the web, but studentpublishing.com is the one I used and I was very happy with the results. We used the published books as presents.
Tuesday, January 1, 2013
I Heard Said the Bird
I Heard Said the Bird
Author: Polly Berrien Berends
Possible Common Core Standard:
W.4.3
I love using picture books to introduce and reinforce a skill or concept. I think this book would be a great one to teach using quotation marks. There's much more that could be taught with this book, but I'm going to focus on quotation marks for dialogue.
First I would read the above mentioned story for some quick story element discussion and simple enjoyment of the story.
Choose one of the videos from the following site to introduce quotation marks after defining dialogue.
http://www.watchknowlearn.org/Video.aspx?VideoID=27230&CategoryID=1568
Display the first page of the story on a document camera. Ask students to read it to you or with you. Students should silently look for sentences with dialogue and quotation marks. Let them know they are going to be asked to share with with a classmate. After a short time ask them to turn to their shoulder partner. Taking turns and only identifying one pair of quotation marks students should read each sentence with a pair of quotation marks. Next ask students to think about what they notice about the quotation marks. After a short time ask them take turns sharing one idea at a time with their shoulder partner. Log observations on chart paper. Add to the list if necessary. (I want them to notice a new paragraph with each new person talking along with the punctuation order and capitalization.)
Read the second page. Ask who is talking and how do they know. Ask students to share with each other their observations about the dialogue and how it is marked. Continue through the story. (Since the story has already been read in its entirety, I would stop when I felt like the students had the concept making sure I stopped after the page asking the goose and the hare. This is a good opportunity to talk about why there are no quotation marks on this page. Instead of reading each page and working through the book, you could select certain pages in the story.)
Depending on the time available and what future time might be available I would either do a quick write that day with an extremely short story about a bird sharing some information with animals using dialogue among the animals or spend a few days developing a story about either a bird or another animal using dialogue.
When students are done writing using quotation marks, they can check their work by copying and pasting it into the following site. (This a is paid site, however, a sample writing can be submitted for review.)
http://www.grammarly.com/?q=punctuation&gclid=CLLy9tDgwLQCFSemPAodWWwAxw
More information on quotation marks:
http://programs.northlandcollege.edu/owl/Quotation%20mark%20rules.htm
http://grammar.ccc.commnet.edu/grammar/marks/quotation.htm
http://www.grammar-monster.com/lessons/quotation_(speech)_marks_punctuation_in_or_out.htm
Website with an activity with this book:
http://isites.harvard.edu/fs/docs/icb.topic1063934.files//I%20Heard%20Said%20the%20Bird.pdf
Author: Polly Berrien Berends
Possible Common Core Standard:
W.4.3
I love using picture books to introduce and reinforce a skill or concept. I think this book would be a great one to teach using quotation marks. There's much more that could be taught with this book, but I'm going to focus on quotation marks for dialogue.
First I would read the above mentioned story for some quick story element discussion and simple enjoyment of the story.
Choose one of the videos from the following site to introduce quotation marks after defining dialogue.
http://www.watchknowlearn.org/Video.aspx?VideoID=27230&CategoryID=1568
Display the first page of the story on a document camera. Ask students to read it to you or with you. Students should silently look for sentences with dialogue and quotation marks. Let them know they are going to be asked to share with with a classmate. After a short time ask them to turn to their shoulder partner. Taking turns and only identifying one pair of quotation marks students should read each sentence with a pair of quotation marks. Next ask students to think about what they notice about the quotation marks. After a short time ask them take turns sharing one idea at a time with their shoulder partner. Log observations on chart paper. Add to the list if necessary. (I want them to notice a new paragraph with each new person talking along with the punctuation order and capitalization.)
Read the second page. Ask who is talking and how do they know. Ask students to share with each other their observations about the dialogue and how it is marked. Continue through the story. (Since the story has already been read in its entirety, I would stop when I felt like the students had the concept making sure I stopped after the page asking the goose and the hare. This is a good opportunity to talk about why there are no quotation marks on this page. Instead of reading each page and working through the book, you could select certain pages in the story.)
Depending on the time available and what future time might be available I would either do a quick write that day with an extremely short story about a bird sharing some information with animals using dialogue among the animals or spend a few days developing a story about either a bird or another animal using dialogue.
When students are done writing using quotation marks, they can check their work by copying and pasting it into the following site. (This a is paid site, however, a sample writing can be submitted for review.)
http://www.grammarly.com/?q=punctuation&gclid=CLLy9tDgwLQCFSemPAodWWwAxw
More information on quotation marks:
http://programs.northlandcollege.edu/owl/Quotation%20mark%20rules.htm
http://grammar.ccc.commnet.edu/grammar/marks/quotation.htm
http://www.grammar-monster.com/lessons/quotation_(speech)_marks_punctuation_in_or_out.htm
Website with an activity with this book:
http://isites.harvard.edu/fs/docs/icb.topic1063934.files//I%20Heard%20Said%20the%20Bird.pdf
365 Book Activities
I'm going to try to post a book a day with an activity related to the common core standards as I interpret them. Please keep in mind, I'm not a common core expert.
There is no particular order to the books and activities that will be posted.
There is no particular order to the books and activities that will be posted.
Tuesday, November 20, 2012
Book Project
Possible Common Core Standards:
RL.4.1
RL.4.4
I was given the opportunity to do a reading project with a class of fourth graders over the book Tales of a Fourth Grade Nothing by Judy Blume. I had four days to complete it. I would recommend more time.
As this classroom was technology challenged the project had to be something other than technology based. (If I did this in a classroom with access to Publisher, I would complete the project using that program and possible some clip art or allow the students to illustrate by hand the story, scan and place the pictures on the board/cards.)
We used a piece of construction paper and drew small lines three inches from the edge all around the perimeter of the paper. Then drew straight lines connecting all of the dots to create a 'frame' around the paper. In one corner we designated the START box. Because I wanted the boards to be somewhat different, I allowed the students to choose the size of their boxes. No bigger than 3 x 3 (inches) and preferably no smaller than 2 x 3. This caused a bit of a dilemma as we progressed through the book as some students had seven extra boxes. After chapter four I visited with each student about his/her board. We designated two squares for each chapter with an extra box here and there. The students with extra boxes were directed to choose something from the story not already on the board to draw in the extra box. On my 'map' below I have one 'anything from story' box.
As the book has ten chapters we needed a minimum of 20 squares on the board. The middle of the board had the title of book and a place to put the two sets of cards that were a part of the game. One set of cards were called 'Connection' cards. The cards had a question to help the student make connection to a part of the story. (A picture of our connection cards are included. Keep reading.) The other cards were vocabulary cards. As we read each chapter we picked out two to four words (depending on how much time we had) from the chapter to put on cards. We also looked up a definition or thought of a definition that fit the word for the story. I kept a list of the vocabulary terms and definitions to make a master list. Each game board was given a vocabulary master list to help with disputes when playing the game.
Each box on the game board had a smaller C box, +V box, or -V box. I gave the students specific instructions how the C, +V and -V boxes were to be colored as to create uniformity for that part of the game. For example the C box had a yellow background with a red C in the middle. Every C box on the game board was colored in this way. The START box had a +V on it as each student starts the game with a vocabulary card.
Students picked two events from each chapter to illustrate on their board. Sometimes a sentence was added to the illustration. Each chapter had two boxes.
I didn't have any method to deciding which boxes were given a C, +V or -V. I tried to have more +V because the vocabulary cards are the key to 'winning' the game. I used the C boxes the least.
Each game board needs two tokens and a number cube. (1-6) We kept the number of players per game board limited to three. Two is best.
Each student put his/her token on start. Determine who is going first. The first person rolls and counts the number of spaces. The little box (C, +V, -V) tells the player what to do.
C The player takes the top Connection card and reads it to the other player(s). He/she answers the questions. I do not require students to answer the questions if they feel uncomfortable answering the question. They are allowed to say 'I don't have an answer to that question.' Questions like the playground safety rules for school, 'would you like to have a turtle for a pet' or 'would you like to live in NYC' are expected to be answered. I tried to come up with at least one question per chapter with students help.
+V The player takes a vocabulary card. It will either be a term or a definition. If it matches a card taken previously the student will want to 'protect' it. We turned matches face down to 'protect' them.
-V The player must return a vocabulary card to the bottom of the pile. If the player has no cards, his/her turn is over. If the player has matched pairs of vocabulary cards and no others, one pair must be broken as a card must be placed on the bottom of the vocabulary card pile.
(A 'steal' option for vocabulary cards would be fun in the game, I haven't time to explore how to incorporate that into the game.)
When the vocabulary cards are all gone from the game board, the game stops. Count the number of
vocabulary card matches. Whoever has the most, wins.
RL.4.1
RL.4.4
I was given the opportunity to do a reading project with a class of fourth graders over the book Tales of a Fourth Grade Nothing by Judy Blume. I had four days to complete it. I would recommend more time.
As this classroom was technology challenged the project had to be something other than technology based. (If I did this in a classroom with access to Publisher, I would complete the project using that program and possible some clip art or allow the students to illustrate by hand the story, scan and place the pictures on the board/cards.)
We used a piece of construction paper and drew small lines three inches from the edge all around the perimeter of the paper. Then drew straight lines connecting all of the dots to create a 'frame' around the paper. In one corner we designated the START box. Because I wanted the boards to be somewhat different, I allowed the students to choose the size of their boxes. No bigger than 3 x 3 (inches) and preferably no smaller than 2 x 3. This caused a bit of a dilemma as we progressed through the book as some students had seven extra boxes. After chapter four I visited with each student about his/her board. We designated two squares for each chapter with an extra box here and there. The students with extra boxes were directed to choose something from the story not already on the board to draw in the extra box. On my 'map' below I have one 'anything from story' box.
 |
| This is my 'map' of the project. |
As the book has ten chapters we needed a minimum of 20 squares on the board. The middle of the board had the title of book and a place to put the two sets of cards that were a part of the game. One set of cards were called 'Connection' cards. The cards had a question to help the student make connection to a part of the story. (A picture of our connection cards are included. Keep reading.) The other cards were vocabulary cards. As we read each chapter we picked out two to four words (depending on how much time we had) from the chapter to put on cards. We also looked up a definition or thought of a definition that fit the word for the story. I kept a list of the vocabulary terms and definitions to make a master list. Each game board was given a vocabulary master list to help with disputes when playing the game.
 |
| our vocabulary master list |
Each box on the game board had a smaller C box, +V box, or -V box. I gave the students specific instructions how the C, +V and -V boxes were to be colored as to create uniformity for that part of the game. For example the C box had a yellow background with a red C in the middle. Every C box on the game board was colored in this way. The START box had a +V on it as each student starts the game with a vocabulary card.
 |
| start box example |
 |
| examples of C, +V, -V |
Students picked two events from each chapter to illustrate on their board. Sometimes a sentence was added to the illustration. Each chapter had two boxes.
I didn't have any method to deciding which boxes were given a C, +V or -V. I tried to have more +V because the vocabulary cards are the key to 'winning' the game. I used the C boxes the least.
Each game board needs two tokens and a number cube. (1-6) We kept the number of players per game board limited to three. Two is best.
Each student put his/her token on start. Determine who is going first. The first person rolls and counts the number of spaces. The little box (C, +V, -V) tells the player what to do.
C The player takes the top Connection card and reads it to the other player(s). He/she answers the questions. I do not require students to answer the questions if they feel uncomfortable answering the question. They are allowed to say 'I don't have an answer to that question.' Questions like the playground safety rules for school, 'would you like to have a turtle for a pet' or 'would you like to live in NYC' are expected to be answered. I tried to come up with at least one question per chapter with students help.
 |
| our connection questions |
+V The player takes a vocabulary card. It will either be a term or a definition. If it matches a card taken previously the student will want to 'protect' it. We turned matches face down to 'protect' them.
-V The player must return a vocabulary card to the bottom of the pile. If the player has no cards, his/her turn is over. If the player has matched pairs of vocabulary cards and no others, one pair must be broken as a card must be placed on the bottom of the vocabulary card pile.
(A 'steal' option for vocabulary cards would be fun in the game, I haven't time to explore how to incorporate that into the game.)
When the vocabulary cards are all gone from the game board, the game stops. Count the number of
vocabulary card matches. Whoever has the most, wins.
Wednesday, July 25, 2012
Classroom Management
I used excel to create a class list with the students' classroom number (the students were numbered in alphabetical order), first and last name. I would copy and paste this list a couple of times on the worksheet and print. Then the lists were cut out and taped down by the phone, by the cubbies (my cubbies were numbered so I didn't have to redo names each year) and one by my desk.
I was lucky enough to have a class set of computers in my classroom and the computers were numbers. I taped a list on the cart to help a student helper or guest teacher determine who had not put their computer up yet.
I called this my 'small' class list. If you want to get fancy, you can set up a master class list and link the 'small' lists to it. Then when you change a child on the master list, it changes all the lists. Print, cut out and replace the other lists and you are ready to go.
Usually I would use a fine tip marker and white out to fix the lists until they were messy from too many students coming and going. Then I would print a new list. Word of warning: Every time I printed a new list a new student would come and mess the new list up. :)

I was lucky enough to have a class set of computers in my classroom and the computers were numbers. I taped a list on the cart to help a student helper or guest teacher determine who had not put their computer up yet.
I called this my 'small' class list. If you want to get fancy, you can set up a master class list and link the 'small' lists to it. Then when you change a child on the master list, it changes all the lists. Print, cut out and replace the other lists and you are ready to go.
Usually I would use a fine tip marker and white out to fix the lists until they were messy from too many students coming and going. Then I would print a new list. Word of warning: Every time I printed a new list a new student would come and mess the new list up. :)

Tuesday, July 17, 2012
Fluency/Repeated Reading
Each week as a part of my students' homework they were to read a passage at least three times each evening. They could time themselves if they wanted to see how many words they could read in a minute, but they were expected to read the entire passage. Their goal was to become smoother and faster readers. We practiced the passage/page every day in class. We discussed words they didn't know and the pronunciation. We talked about stopping at periods, pronouncing the endings on words, reading with expression...we emphasized this is NOT a race. They would read using their 'phones' and I would time them. (Sometimes we used Audacity so they could listen to themselves when done.) They marked on their page where they stopped. I used passages out of teacher books, passages related to what we were reading, passages related to social studies or science or math, but my favorite was a page from the basal. I copied one page with a lot of text. I counted the words and labeled each line. The students were given a copy to practice with and I had a stack ready to mark miscues when they read the passage or page to me on Friday. Earlier in the blog I talked about graphing their scores. The score from Friday was the 'final' score and it was graphed.
http://kstrc387.blogspot.com/2011/02/fluency-graphs.html
http://kstrc387.blogspot.com/2011/02/fluency-graph-example.html
I saved the original passage with the words counted in a notebook in the order of the stories in the basal. If I used something other than the basal, that passage was inserted when I used it. This was very handy the following year as I didn't have to search for a passage/page and didn't have to count words again. They were ready to be copied.
http://kstrc387.blogspot.com/2011/02/fluency-graphs.html
http://kstrc387.blogspot.com/2011/02/fluency-graph-example.html
I saved the original passage with the words counted in a notebook in the order of the stories in the basal. If I used something other than the basal, that passage was inserted when I used it. This was very handy the following year as I didn't have to search for a passage/page and didn't have to count words again. They were ready to be copied.
Vocabulary
I wish I knew where I found the vocabulary levels so I could give the author proper credit.
Each week when introducing the new vocabulary words the students would rate the words. It can be done on paper (make a list of the words for the students and they each rate the words) or it can be done using the smartboard. (Each student had a card with the levels and meanings and a clicker.)
Personally I liked the smartboard (using clickers) because of the graph generated by the results. We would spend a little time discussing the graph and how about half the class really knew the word or less than a fourth of the class knows the word. The graph fascinated the students.
I had to remind students to be honest about their knowledge of the words. At the beginning everyone put their knowledge level of all words at 3 or 4. Once they were comfortable with the knowledge that no one would know who put the rating of 1 or 2 they were honest.
Once we rated and discussed the graphs we moved on to a powerpoint with the words. The powerpoint was loaded with pictures, clip art and video clips that were intended to help the student understand the meaning of the word. The powerpoint was set up so the word did not appear until clicked to appear. The students spent some time thinking about what word was represented, then discussed with a shoulder partner and finally I would make the word appear. They loved being right. I showed them an example of the word in a sentence then they spent some time thinking of a sentence to share with their shoulder partner.
Here are the levels (if you know who created this, please let me know):
1. I never saw it before.
2. I've heard it, but I don't know what it means.
3. I recognize it in context as having something to do with...
4. I know it well.
Each week when introducing the new vocabulary words the students would rate the words. It can be done on paper (make a list of the words for the students and they each rate the words) or it can be done using the smartboard. (Each student had a card with the levels and meanings and a clicker.)
Personally I liked the smartboard (using clickers) because of the graph generated by the results. We would spend a little time discussing the graph and how about half the class really knew the word or less than a fourth of the class knows the word. The graph fascinated the students.
I had to remind students to be honest about their knowledge of the words. At the beginning everyone put their knowledge level of all words at 3 or 4. Once they were comfortable with the knowledge that no one would know who put the rating of 1 or 2 they were honest.
Once we rated and discussed the graphs we moved on to a powerpoint with the words. The powerpoint was loaded with pictures, clip art and video clips that were intended to help the student understand the meaning of the word. The powerpoint was set up so the word did not appear until clicked to appear. The students spent some time thinking about what word was represented, then discussed with a shoulder partner and finally I would make the word appear. They loved being right. I showed them an example of the word in a sentence then they spent some time thinking of a sentence to share with their shoulder partner.
Here are the levels (if you know who created this, please let me know):
1. I never saw it before.
2. I've heard it, but I don't know what it means.
3. I recognize it in context as having something to do with...
4. I know it well.
Sunday, July 15, 2012
IF YOU WERE AN EEL, HOW WOULD YOU FEEL?
A new project I would like to try is fractions with the book IF YOU WERE AN EEL, WHAT WOULD YOU FEEL? by Mina and Howard Simon. After reading and talking about the book I would explain to the students they are going to write a story using the pattern of this book about fractions. A sample title would be If You Were One-Half, How Would You Feel?
If you were one-half, how would you feel?
Or one-fourth
or one-third
or one eighth
how would you feel?
(You could change these to two-thirds, three-fourths depending on the level of your students.)
Say I were one-half -
As one-half
I would feel
like half of a whole.
I would be like
half of a pizza
or half of a glass of milk
or half of a twin
or half of a dollar (50 cents!)
or the number two when thinking of four
or half of an inch.
Say I were one-third -
As one third
I would feel
like an apple with two cherries.
I would be like
a dime in 30 cents
or
I would let students illustrate their content. To make the book a bit thicker, I wouldn't list all of the or statements on one page as the Simon's did in their book, I would put them on their own page. Illustrations can be hand drawn after printing the book or use clip art.
My favorite program is Publisher for something like this. (Don't forget Publisher has a booklet feature you could use to save on paper and ink.) Either print the file or save the file (don't use booklet feature and if you used clip art) as a pdf file and use studentpublishing.com to publish the books.
Make sure you credit the the authors (Mina and Howard Simon) for using their book. It would be nice if you would include this website on your finished project, too.
I think you could also use this book as a springboard to a book on shapes and the attributes of shapes.
Just for fun: website for thirds...http://www.oswego.org/ocsd-web/games/fractionflags/ffthirds.html
If you were one-half, how would you feel?
Or one-fourth
or one-third
or one eighth
how would you feel?
(You could change these to two-thirds, three-fourths depending on the level of your students.)
Say I were one-half -
As one-half
I would feel
like half of a whole.
I would be like
half of a pizza
or half of a glass of milk
or half of a twin
or half of a dollar (50 cents!)
or the number two when thinking of four
or half of an inch.
Say I were one-third -
As one third
I would feel
like an apple with two cherries.
I would be like
a dime in 30 cents
or
I would let students illustrate their content. To make the book a bit thicker, I wouldn't list all of the or statements on one page as the Simon's did in their book, I would put them on their own page. Illustrations can be hand drawn after printing the book or use clip art.
My favorite program is Publisher for something like this. (Don't forget Publisher has a booklet feature you could use to save on paper and ink.) Either print the file or save the file (don't use booklet feature and if you used clip art) as a pdf file and use studentpublishing.com to publish the books.
Make sure you credit the the authors (Mina and Howard Simon) for using their book. It would be nice if you would include this website on your finished project, too.
I think you could also use this book as a springboard to a book on shapes and the attributes of shapes.
Just for fun: website for thirds...http://www.oswego.org/ocsd-web/games/fractionflags/ffthirds.html
Monday, July 9, 2012
Beginning the School Year - Classroom Management
It's that time when I start thinking about the new school year. Here are some of my thoughts and things I do for the beginning of the year.
When starting the school year, I used to have to think about my discipline plan. Now I just think about how I might want to tweak it. I think about how to lay out my room. What worked for me last year, what needs changed, what other expectations are being thrown at me that might impact my room arrangement. More on discipline plans later.
One management tool I like to use is making passes using lanyards. I have a couple of bathroom passes, a couple of office passes, a couple of library passes, a couple of nurse passes (although we have a form to complete so these are only used if I need the child to go to the nurse's office for more band-aids or some other errand) and a couple of hallway passes in case I need a child to go somewhere other than the above mentioned places. I use plastic hooks that are easily removed and reused to store the passes by the classroom door. I used Publisher to create the passes. I added clip art and labeled the passes appropriately. The passes were laminated, cut out and attached to the lanyards.
Another management tool I use is a 'portfolio' of sorts for each child. I do it two different ways and most of the time I use both. One is a notebook with a tab section for each child. The other is a container for hanging file folders (or you can use a file cabinet - I like the container because I can easily transport it and can keep it in the locked closet). I always number my students. They are required to put their name and number on their papers. The numbering system makes it easy to keep track of assignments. The notebook has tabs with numbers on them and the same for the file box. This way I can reuse them year after year and not have to change names. (It also isn't obvious to others that student information is in the notebook or file box.) The notebook contains a parent information sheet on the child, an inventory the child completed, the signed permission slip from the parent/guardian for commenting/writing on the class blog and other technology pieces in our classroom, the child's results from any beginning of the year screenings/tests and any other pertinent information. The file box contains work for conferences.
I have a box labeled 'absent folders' with a numbered file folders in it. Back in worksheet days I would put the work a child missed in their folder. I didn't use this box so much in the last few years as I didn't pass out many worksheets. If someone was absent several days it was handy for putting the homework in, notes from the office and anything else that the child/parent might need when the child returned. It was nice to have it in one spot and not jammed into a desk, scattered on top of a desk, or in a cubby with who knows what all else.
One of my favorite beginning of the year things to do with my 4th grade students is to make name tags for their desks. I love using Publisher with my students and this is their introduction to it. I take their pictures and load them in a file that is accessible to them. They open the template I have for them, put their name in, and insert their picture in the spots provided. They learn how to re-size the picture, save the document in their folder, and print it. The template has the name tag and other picture/name boxes that are used for an attendance chart, their computer accessories bag, and the center chart. They cut the documents out and add color to their name tag. I laminate them and we tape them to their desks. Substitutes love them. I also use the pictures to create a seating chart for my sub folder.
When starting the school year, I used to have to think about my discipline plan. Now I just think about how I might want to tweak it. I think about how to lay out my room. What worked for me last year, what needs changed, what other expectations are being thrown at me that might impact my room arrangement. More on discipline plans later.
One management tool I like to use is making passes using lanyards. I have a couple of bathroom passes, a couple of office passes, a couple of library passes, a couple of nurse passes (although we have a form to complete so these are only used if I need the child to go to the nurse's office for more band-aids or some other errand) and a couple of hallway passes in case I need a child to go somewhere other than the above mentioned places. I use plastic hooks that are easily removed and reused to store the passes by the classroom door. I used Publisher to create the passes. I added clip art and labeled the passes appropriately. The passes were laminated, cut out and attached to the lanyards.
Another management tool I use is a 'portfolio' of sorts for each child. I do it two different ways and most of the time I use both. One is a notebook with a tab section for each child. The other is a container for hanging file folders (or you can use a file cabinet - I like the container because I can easily transport it and can keep it in the locked closet). I always number my students. They are required to put their name and number on their papers. The numbering system makes it easy to keep track of assignments. The notebook has tabs with numbers on them and the same for the file box. This way I can reuse them year after year and not have to change names. (It also isn't obvious to others that student information is in the notebook or file box.) The notebook contains a parent information sheet on the child, an inventory the child completed, the signed permission slip from the parent/guardian for commenting/writing on the class blog and other technology pieces in our classroom, the child's results from any beginning of the year screenings/tests and any other pertinent information. The file box contains work for conferences.
I have a box labeled 'absent folders' with a numbered file folders in it. Back in worksheet days I would put the work a child missed in their folder. I didn't use this box so much in the last few years as I didn't pass out many worksheets. If someone was absent several days it was handy for putting the homework in, notes from the office and anything else that the child/parent might need when the child returned. It was nice to have it in one spot and not jammed into a desk, scattered on top of a desk, or in a cubby with who knows what all else.
One of my favorite beginning of the year things to do with my 4th grade students is to make name tags for their desks. I love using Publisher with my students and this is their introduction to it. I take their pictures and load them in a file that is accessible to them. They open the template I have for them, put their name in, and insert their picture in the spots provided. They learn how to re-size the picture, save the document in their folder, and print it. The template has the name tag and other picture/name boxes that are used for an attendance chart, their computer accessories bag, and the center chart. They cut the documents out and add color to their name tag. I laminate them and we tape them to their desks. Substitutes love them. I also use the pictures to create a seating chart for my sub folder.
Tuesday, February 14, 2012
Transformations
The students created a short video using PhotoStory3 (a free download), Word and PowerPoint.
Here is a link to student examples. Directions below. http://mrscooksfantasticfourthgrade.blogspot.com/2012/02/transformations.html




Here is a link to student examples. Directions below. http://mrscooksfantasticfourthgrade.blogspot.com/2012/02/transformations.html
In Word we wrote a few sentences explaining translation. After we wrote the sentences we used an animal figurine (we used a chicken or rooster) to demonstrate translation on a grid. Then, using italics, we added the information about pictures we wanted to add to the paragraph.
1. Example Paragraph:
Translation is when something moves from place to place. It means to slide. I can remember slide and translation are the same by the sl in both words.
2.
After the paragraph, the students figured out how to show slide with the animal and the grid. They added this information to their paragraph in italics.
Translation is when something moves from place to place. It means to slide. (Picture one: chicken on (4,4)) (Picture two: chicken on (5,4)) I can remember slide and translation are the same by the sl in both words.
Now for the fun part! Take the pictures of the chicken using the directions determined earlier

.
 |
| (When the pictures were inserted into PowerPoint, they were edited using picture tools.) |
5.
Repeat the process with reflection, then with rotation.
6.
Open PowerPoint and create a title page. Then type the transformation information on a slide or copy and paste from the Word document. Leave a blank slide for each picture. Insert pictures in the correct places. Draw a red line to show the movement. Do this for rotation and reflection.




Then save the powerpoint as jpeg files.


After files are converted to jpeg files, open PhotoStory3 and import the pictures. Once the pictures are imported you will want to change the motion (transitions) on the pictures. We left the first two slides alone and allowed the defaulted transitions to happen, then we fixed the transitions on the rest of the slides.


If you don't do this, your movie will look like this. We think it is distracting.
This movie has the transitions fixed.
Subscribe to:
Posts (Atom)